Содержание
How to add a User, Contact, or Company in Feng Office
When adding a person to Feng Office, you are doing one of two things:
- You are creating a new user (so that they can access the system)
- Simply add the contact information (for reference, e-mailing, etc.)
For every person in Feng Office, you will at least have the contact information.
Adding a user
There are currently several ways in which you can create a new user in Feng Office:
- Dashboard widget quick “add”
- Settings Panel “add”
- Contacts tab “add”
Dashboard widget quick add
When you log in to Feng Office, you will notice a Dashboard with several widgets. On your right, you may see one similar to the following:

In that widget, you will be able to see some of the people who have last had activity in the project, client, folder, or workspace you are in.
You may also be able to create a new user by clicking on the “Add user” button at the end of the list. You will be redirected to the following screen:

The following are the fields required to complete:
- First name
- Last name
- Email address
- User type: This value will be used to limit the user permissions (i.e.: Administrator)
More contact info: In this tab, you will be able to add more information about the new user, such as their birthday, their address, and notes about him/her.
User data: In this tab, you will be able to specify the password and the username for the new user and/or send them an email notification to the address entered so he/she can define the password.
Permissions: In this tab, you will be able to configure the user´s permissions beforehand. Here You will find more information regarding permissions and how to set them.
Linked objects: In this tab, you will be able to link an object to the newly added user (for example, a document or a contact)
After you fill in all the details, please click on the 'Add user' button. If you click on the “send e-mail notification” option on the User Data tab, an email will be sent to the email you input so that the person can set up their password.
- Note: After entering the user, if you did not do so at the moment, it is always recommended that you check the user permissions that the system assigned by default. You may want to add or remove access permissions for the new user.
Settings Panel add
You can add Feng Office users on the settings panel, too.
Here is how:
2. Click on 'Users, Groups and Permissions', and then on 'Add user'

3. Enter the user's information (as explained in the previous section)

* Note: After entering the user, if you did not do so at the moment, it is always recommended that you check the user permissions that the system assigned by default. You may want to add or remove access permissions to the new user.
Contacts Tab Add
To add a person to the contact list view, you have to:
1 - Go to the “Contacts” tab.
2 - Click on the “New” button. Then, select “User”.

3 - Enter the new user´s information (as explained above)
4 - Save by clicking on the “Add user” button.
- Note: After entering the user, if you did not do so at the moment, it is always recommended that you check the user permissions that the system assigned by default. You may want to add or remove access permissions to the new user.
Providing access permissions to a person
There are several ways to provide access permissions to a person.
For a complete explanation of user access and system permissions, please refer to this section.
Importing contacts through a .CSV file or a VCard file
Feng Office allows you to upload your contacts through the CSV or VCard file import as a much quicker and easier method of uploading.
To do so, first, you must enable the Contacts Module, which may be disabled by default. See the following link that explains module activation: How to Enable a Module.
Once it is enabled, you must do the following:
- Access the Client, Project, Folder, Workspace, etc., where the contacts will be imported.
- Access the Contacts tab
- Click on Import/Export, and select Import
- Select Persons
- Select whether you will be using a CSV file or a VCard file as shown below:

CSV Importation
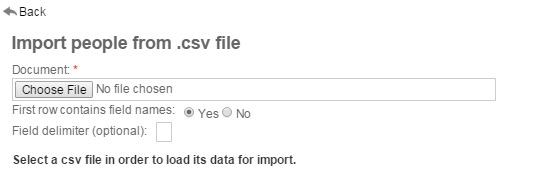
You must first choose the file you will be using to import the contacts from.
Important Notes
- You should not disable the option that says “First row contains Field Names”.
- You may choose a different delimiter in case it is not a comma (Default).
After selecting the files, please match the Feng Office fields (on your left) with the fields brought by the file chosen (on your right).
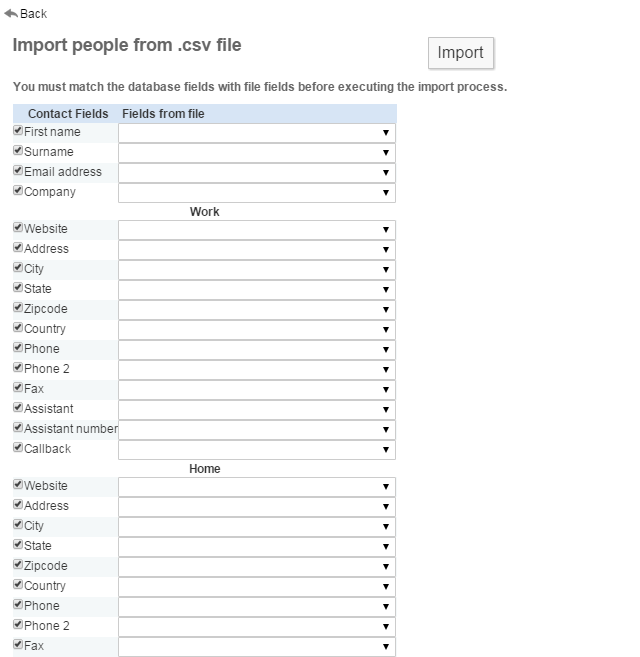
After doing this, simply click on Import.
VCard Importation
1. You must first select the .vcf file that you want to import:

2. Once the file is chosen, you will receive this notification:

3. Now simply double-click on the Contacts Tab or click on the Back button, and your newly added contact will appear like this:
 .
.
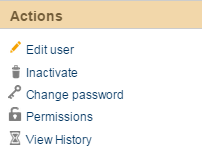
4. Now, finally, click on your newly added contact to see the detailed information or edit the contact from the action panel:

Adding a company
Adding a 'Company' serves several purposes in Feng Office:
- It allows you to input numerous contact information for the company
- It allows you to group people related to the same company
- It allows you to quickly classify and access all information related to the company
To add a company in Feng Office, you must do the following:
- Select View All on the NavBar and Go to your Contacts Tab.
- Click on the “+ New” Button.
- Select “Company”

After doing this, enter the Company's information

- Make sure to enter all the contact information that you have for the company
Finally, click on the “Add Company” button.
You will now see the company displayed in the navigation panel and the dashboard as shown here:

- Note: In some installations, the first company that is added may not be displayed right away. This only happens with the first company that you add. Hitting 'refresh' on your browser fixes this issue.