This is an old revision of the document!
Installing & Upgrading OpenGoo
System requirements
Before installing OpenGoo make sure that your server matches these requirements:
- OpenGoo needs PHP5, not PHP4. If your server is running PHP4 you will get an error message during the installation process saying:
Installation error: in order to run OpenGoo you need PHP5. Your current PHP version is: 4.x.x.Some hosting providers allow you to switch PHP versions; if your provider doesn't you need another server. - OpenGoo consumes about 10 MB of memory. If your server is set to the standard memory limit of 8 MB you may get an error message during the installation process saying:
Allowed memory size of 8388608 bytes exhausted.This can be solved by settingmemory_limit=32in php.ini. - OpenGoo needs a MySQL database server with InnoDB support.
Installation
For a fresh installation, follow these steps:
- Download OpenGoo from http://www.opengoo.org.
- Unpack the downloaded archive on your local hard drive.
- Upload the files to your web server using a FTP client (i.e. FileZilla or CyberDuck).
- Create a new MySQL database for OpenGoo using your preferred database administration tool (i.e. phpMyAdmin).1)
- Direct your browser to http://www.yourdomain.com/some_directory/opengoo/public/install and follow the installation procedure (or see the detailed installer manual).
Upgrading
Upgrading an existing OpenGoo installation can be done either by automatic upgrade or by manual upgrade. The usual and much simpler way is the automatic upgrade. If you experience problems with the automatic upgrade (i.e. because your webserver doesn't have write access to all folders) you can still do a manual upgrade (which is more or less the same procedure as in any PHP application).
Automatic Upgrade
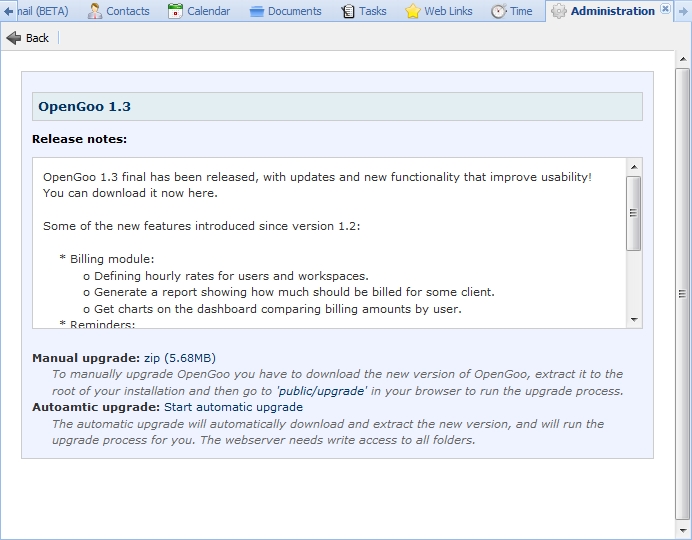
To perform an automatic upgrade simply go to the administration panel and choose “Upgrade”. If there is currently an upgrade available you will see a screen as the one above. The release notes give you a brief overview of the new features (you'll find additional information in the OpenGoo blog).
- Manual upgrade: This link will download the new release for a manual upgrade (described below).
- Automatic upgrade: Click here if you want to perform an automatic upgrade immediately.
After a successful automatic upgrade please clear your browser cache to make sure that all JavaScripts, CSS style sheets and images are loaded correctly.
PLEASE NOTE: If you are experiencing problems during the automatic upgrade (i.e. if you get a database error message), you can still perform a manual upgrade to solve the problem.
Manual Upgrade
PLEASE NOTE: For details about upgrading see the readme.txt file in the root directory of every OpenGoo distribution.
Upgrading OpenGoo is easy as long as you follow these rules:
- Before upgrading it's absolutely essential to backup your existing data (the OpenGoo database and the OpenGoo installation directory with all the containing files).
- If you are copying the files of the new version to your server, don't overwrite the following folders (because they contain your data):
config(OpenGoo configuration is stored here)upload(OpenGoo documents are stored here if you are using filesystem storage)public/files(avatars and logos are stored here)
- After copying the new files to your server you 'll need to run the upgrade process. To start the wizard direct your browser to
http://your_opengoo_root/public/upgrade. - If you are upgrading from 1.1 or older versions you will need to choose from which version to upgrade. If you are upgrading from 1.2 onwards OpenGoo will know you current version, and will only ask you to which version to upgrade. The latest available version is the safest choice.
- Clear your browser cache to make sure that all JavaScripts, CSS style sheets and images are loaded correctly.
Recovering config.php
When you accidentally overwrite the file config/config.php during an upgrade your OpenGoo installation will become unavailable: You will get the message that OpenGoo is not installed, but when you try to re-enter your database parameters in the installer it will tell you that the tables could no be created because they exist already.
To solve this problem you have to enter your database parameters manually into the file config/config.php. To do so, copy the content of the file config/empty.config.php into config/config.php and enter the correct values for the constants defined there.
Moving an existing installation
Let's say you have installed your OpenGoo in the following directory:
http://www.myserver.com/mydirectory/opengoo/
Now you decide to move this installation to:
http://www.myserver.com/another_directory/
Simply moving all files with your FTP client is the first step, but that's not enough - you have to go through these two steps as well:
- Change the path in the file
config/config.phpaccordingly. - Delete the file
cache/autoloader.php.(It will be recreated automatically with the new path.) - Change the permissions of the following folders to 775 (or 777 on some hostings): /cache, /config, /tmp, /upload, /public/files

