This is an old revision of the document!
Navigating in OpenGoo
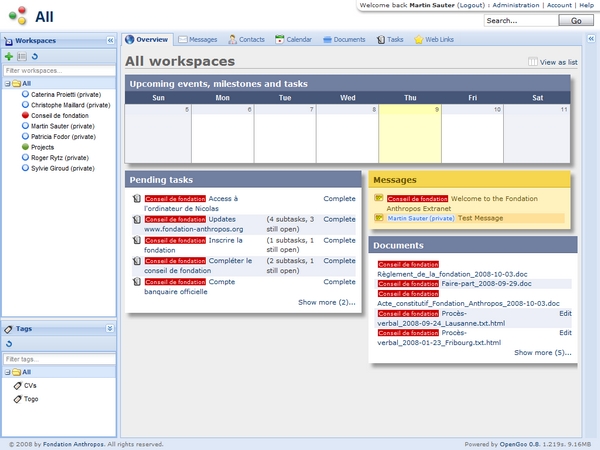
If you look at typical screen in OpenGoo, you will see basically the following areas:
- The main area with tabs
- The header
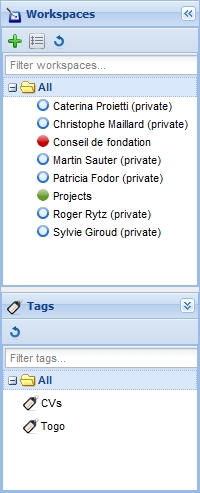
- The left sidebar with workspaces and tags
- The right sidebar with the online help
Main area
In the main area you get access to the information stored in OpenGoo to read, edit, add or delete it. Using the tabs on top you select the module you want to work with. Within a module there are usually three different views:
- List views are tables of objects of a certain type. For example, in the
Notesmodule the list view presents all notes in rows and columns. Not every module has this generic form of a list view: TheCalendarmodule uses a graphical representation of months, weeks and days to display events, and theTasksmodule has a slightly different approach. - Detail views offer - hence the name - more details of one single record, and it gives you additional commands for editing a record.
- Edit views consist of forms that allow you to edit all details of a single record. They are usually divided in subsections that can be made visible or invisible according to your needs.
Tabs and toolbar
The tabs on top of the content area are the main navigation element in OpenGoo. Here you choose the information type you want to work with. The labels on these tabs give you a good impression of what type of information you have to expect.
There is a special tab called “Overview”. Think of it as the starting point or homepage of your OpenGoo installation. The overview offers you a selection of the most important, most urgent or most recent information. You can call it a dashboard, if you like.
Depending on the tab you select you often get a toolbar right below the tabs. Clicking on a tool either executes a certain command directly, or you get a dropdown menu to select one of several options.
Left sidebar
The left sidebar offers two different methods for filtering the information presented in the content area: workspaces and tags. These two have been introduced before, so if you can't remember how the work, please re-read the according section on this page.
Selecting a workgroup or a tag is as simple as clicking on it. Please note that you can select only one single workgroup or tag at a time. To reset a filter simply click on “All” again.
You can use workgroups and tags simultaneously. Please keep in mind that these two filters will add up and narrow the results of your filtering process (like in search that uses two search terms connected whith a logical AND condition).
If you have a lot of workspaces or groups, you can even filter your filters by filling in the “Filter workspaces…” or “Filter tags…” field.
Please note that you can move the divider between the workgroups and the tags section to your needs. If you need more space on your screen, you can always hide the tags box or even the whole left sidebar by clicking on the arrow buttons.
To learn more about tags, please read Working with tags.
If you don't need workspaces and tags at the moment or want more room for the content area, simply hide the left sidebar using the arrow button in the upper right corner.
To open the left sidebar, you have two possibilities:
- To open it permanently, click on the arrow button itself.
- To open it temporarly, click in the area below the arrow button.
Right sidebar
The right sidebar will contain help texts starting from OpenGoo 1.0. In earlier versions (up to version 1.0 RC1) it is empty.
If you don't need help or want more room for the content area, simply hide the right sidebar using the arrow button in the upper right corner.
To open the right sidebar, you have two possibilities:
- To open it permanently, click on the arrow button itself.
- To open it temporarly, click in the area below the arrow button.


